To start with the following tools need to be downloaded:
1. PuTTY
2. PuTTYGen
3. Pageant
If you are a Windows user & trying to connect to (SSH into) an AWS EC2 instance then you need to use PuTTY.
During the process of provisioning an EC2 instance, you would have created/downloaded a key pair file which would be in a .pem format. But PuTTY doesn't support the .pem format and it needs the key pair file to be in .ppk file format. That's where PuTTYGen comes into play. PuTTYGen helps in converting a .pem file into a .ppk file with a click of a button.
Connecting to an EC2 instance in a public subnet:
1. Open PuTTyGen
2. Load >> Choose the .pem which you want to convert
2.1 [Optional] Provide a key passphrase & confirm passphrase. For simplicity sake, I skip it for now.
3. Click on "Save private key"
4. Open Putty
5. Enter the hostname / IP - For ex: ec2-user@35.154.74.77
6. Copy paste that into Saved Sessions textbox as well
7. Category > Connection > SSH > Auth > Choose the .ppk file which you saved in step 3.
8. Category > Session > Click on Save.
9. Now click on "Open" to ssh to that instance.
Do not forget to save this session again so that this change is also saved in PuTTY.
1. PuTTY
2. PuTTYGen
3. Pageant
If you are a Windows user & trying to connect to (SSH into) an AWS EC2 instance then you need to use PuTTY.
During the process of provisioning an EC2 instance, you would have created/downloaded a key pair file which would be in a .pem format. But PuTTY doesn't support the .pem format and it needs the key pair file to be in .ppk file format. That's where PuTTYGen comes into play. PuTTYGen helps in converting a .pem file into a .ppk file with a click of a button.
Connecting to an EC2 instance in a public subnet:
1. Open PuTTyGen
2. Load >> Choose the .pem which you want to convert
2.1 [Optional] Provide a key passphrase & confirm passphrase. For simplicity sake, I skip it for now.
3. Click on "Save private key"
4. Open Putty
5. Enter the hostname / IP - For ex: ec2-user@35.154.74.77
6. Copy paste that into Saved Sessions textbox as well
7. Category > Connection > SSH > Auth > Choose the .ppk file which you saved in step 3.
8. Category > Session > Click on Save.
9. Now click on "Open" to ssh to that instance.
Connecting to an EC2 instance in a private subnet:
EC2 instance in a private subnet will not have a Public IP instead it would only have a Private IP. So the question in hand is from a windows machine how would you connect to this EC2 instance with Private IP on a private subnet.
1. For this, we need to make use of Pageant. It's actually a windows service. Just double click to run Pageant and it would sit in the system tray doing nothing until you add a private key into it
2. Double clicking on the Pageant icon in the system tray will open up the "Pageant key list" dialogue box.
3. Choose the .ppk file by clicking on "Add Key". Pageant will now load the private key. If the key is protected by a passphrase, Pageant will ask you to type the passphrase. When the key has been loaded, it will appear in the list in the Pageant window.
4. Once you see a screen like shown above click on "Close".
(Now if you start PuTTY and open an SSH session which expects this keypair file. It will notice that Pageant is running, retrieve the key automatically from Pageant, and use it to authenticate. You can now open as many sessions as you like without having to type your passphrase again.)
5. Now open PuTTy and if you had saved the earlier session the name would be listed there. Click on it and Load.
6. Navigate to connection configuration section and check "Allow Agent Forwarding". For me, it worked only after providing the "Private key file for authentication" here as well. [But you can check by leaving it empty as well.]
Do not forget to save this session again so that this change is also saved in PuTTY.
7. As agent forwarding enabled in the PuTTY configuration, from this connection you can connect to any other instance in the VPC without having the SSH private key here.
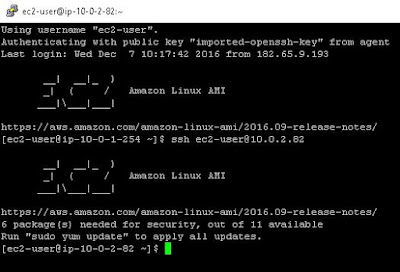
Assuming our EC2 Instance private IP is 10.0.2.82 we can just do a basic SSH command as shown below and connect into it.


Comments